|
Everybody has derailleur
problems. Unless your bike is just for show, you're going to have shifting
problems. There's no way to stop them. But with some good maintenance
techniques, you can really cut down the amount of rides that shifting
problems spoil.
The trick is that there is no
trick. There isn't one thing you have to do to keep your bike shifting well.
There are a bunch of different things, any one of which can cause all sorts
of problems. The first thing goes without saying, always lube your chain. It
can make a huge difference in shifting performance.
The most common cause of poor
shifting is probably the cables.
a. Old, worn, dirty cables can
cause a lot of friction, which will make downshifting difficult. If the
cables are really bad, the spring in the derailleur might not be strong
enough to counter it, and up shifting might be impossible. Cables are pretty
cheap and easy to do yourself, so if you ride in dirty conditions, you might
want to just replace them every spring.
b. The most basic adjustment of
your shifter cable is the bolt on the derailleur that pinches the cable.
There are a few techniques to attaching this, but here's the way I do it:
First tighten the barrel adjuster knob (more on that in a minute) on your
shifter and derailleur if it has one. These are hand-turn knobs. Turn them
to the right until the inner bolt is all the way 'in'. Now let the spring in
your derailleur shift the chain all the way to the smallest gear in the
rear. Adjust your shifter to match, so if the cable was working, it would
shift into the smallest gear. Now full the cable firm with a pair of pliers
and tighten the clamp bolt, with as little movement of the derailleur as
possible. This can be tricky; it might take a few tries. Once you have it
on, you're not done yet, you then have to move on to the next step...
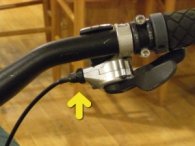
c. Adjusting your barrel
adjusters are probably the closet thing to a silver bullet there is. Look at
your rear derailleur from straight behind or straight in front. Pedal with
your hand and shift through your gears. You want your chain to be as
straight as possible going from the derailleur's hear, to your wheel's gear.
If it�s off just a little bit, you can use your barrel adjusters. The
(awesome) Shimano XT Shadow derailleur doesn't have a barrel adjuster, but
most rear derailleurs do and all shifters I've seen do. A barrel adjuster is
a bold that your shifter housing fit in. The bold has a big plastic knob
around is so you can easily adjust it by hand, even with gloves on. Twisting
the knob moves the bolt in and out. This brings the housing with it, and
lets you essentially make your cable housing longer or shorter. A shorter
housing will release tension on the cable and your derailleur will move
slightly in one direction. A longer housing will increase tension and move
the derailleur your other way. Keep pedaling by hand as you make these
adjustments to keep everything flowing nice and smooth. You can only make
minor adjustments with the barrel adjusters, if the derailleur cable is WAY
off, you'll need to re-do the previous step.
d. If you're derailleur is new,
you'll have to adjust your limit screws too. You rarely have to readjust
these screws, but it can happen. These screws simply but a hard limit on how
high or low your derailleur can go. They physically stop the derailleur
pivots from bending past a certain point. There are two screws, one for the
top and one for the bottom. You want to adjust them both so that you can
easily get in to both your largest and smallest gears, but you also don't
want the shifter to ever go PAST each gear, then you'll shift the chain
right off the gear and into your spokes, or frame. Limit screws only effect
the outer limits of your derailleur. If you are having issues with poor
shifting in middle gears, limit screws will do NOTHING for you.
The second most common source
for poor shifting is likely the bent derailleur hanger.
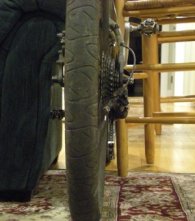
a. A derailleur hanger is the
piece of metal that hangs down from your frame. It's the piece that your
derailleur actually bolts on to. On most steel and titanium frames, the
hanger is part of the frame. On most aluminum bikes, the hanger is a
separate bolt on piece made of super soft aluminum. This is done so that if
you catch your derailleur on something, it will tear the hanger off without
damaging your expensive frame. The downside is that you really can't bend
aluminum back into place. So if your hanger is bent, the official repair is
to replace it with a new one. At ~$25 a pop, that can get expensive, so I
usually bend mine back into place anyway.
b. So how do you know if your
derailleur is bent? Well, unless it�s VERY bad, you really can't eyeball it.
There are very few straight pieces of metal in a derailleur, so it's very
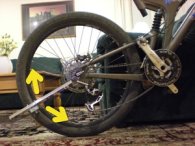
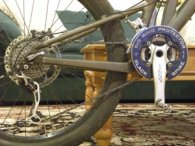
hard to judge by eye. So what you really need is the Park Tools DAG
Derailleur Hanger Adjustment Gauge!
c. This little guy isn�t very
little. And it�s a bit pricey too. But if you want consistent shifting, you
need this tool. If you ride hard, you will probably use this tool weekly at
least. Yes, that�s how easy it is to knock a flimsy little aluminum
derailleur hanger out of alignment.
d. So step one to using this
tool is to true your back wheel. Yup. It uses the plane of your wheel to
gauge the alignment of your hanger, so if you have any wobbles in your
wheel, take care of those first. I've heard some people say that your rear
wheel has to be "perfectly" true to use this DAG too. It doesn't. Just make
sure it's "pretty true". No wobbles etc.
e. Now remove your rear
derailleur. Just one bolt. You don't have to undo the cables (since we just
got the cable aligned perfectly). Just undo the one bolt that holds the
derailleur on and gently let it hang as you work around it.
f. So screw the DAG tool into
the derailleur hanger, all the way. The other end of the tool is adjustable
and what you do is rotate the tool around your wheel sliding the end up and
down, to keep the thin bar lined up with your rim. If your hanger is out of
alignment, the space between the thin bar and the rim will not be
consistent.
g. So if your hanger as
aluminum, the official next step is to replace it. But if you're not made of
money, it can't hurt (actually it could - disclaimer-) to try the next step.
h. If your hanger is steel or
titanium, it's time to bend it back into shape. This is easy to do; you just
have to be patient. The DAG tool is very solid, so after using it and
figuring out which way the hanger need to go, apply gentile but firm
pressure on the tool to bend the derailleur. Do a very little bit at a time,
and then re-gauge against the wheel. Especially if you are doing aluminum,
the least amount of bending, the better. So you don't want to over bend.
Just keep doing a little bit at a time until the gauge maintains the proper
spacing all the way around the wheel.
i. Also, don't be afraid to hit
up your frame manufacturer once in a while and see if you can't get some
free derailleur hangers. For the $2000 you probably paid for your aluminum
frame, the least they can do is send you a few free hangers since they get
bent practically every other ride if you ride hard.
Off-Topic: Why don't they make
aluminum frames with soft steel derailleur hangers? You'd still be
protecting the frame from damage if the hanger was softer than the frame,
but if it was steel, you'd be able to bend it back many many times before
replacing it. Since steel is no where near as brittle as aluminum is.
Derailleur hangers are like monthly payments you pay on a bike that you
already own outright.
Another cause of poor shifting
is chain & gear wear.
As your chain gets old, it
stretches out. As a chain stretches, its force is no longer shared among all
the teeth of your gear, all the pressure gets put on the first tooth. This
stretching happens in unison, so for a while you won't have any problems
from this. But if you replace just one gear, or just the chain, without
replacing everything else, you'll get components that aren't matched and
you'll get some phantom chain skipping. Another common problem I have is on
my middle rings. I'm not sure why it's the case, but even on drive trains
that aren't that old, my middle ring apparently wears much quicker than all
the rest. Keep in mind I use all three of my front gears often, and probably
use the middle one the least. But if you have a problem where only one of
your front gears is causing skipping, you'll probably be ok if you just
replace that one gear. If you are getting lots of chain skipping from all
over your drive-train, even after you check all your other adjustments - and
if your drive train is a year or two old, or more� then you may have to
replace the whole thing. Whole thing meaning a new cassette, new chain, and
three new chain rings. Might be a good time to get a whole new crankset, if
you can find a nice deal.
The last thing that can cause
shifting problems is a bad derailleur itself. There are two primary ways a
derailleur can go bad. The pivots can wear out, causing lots of flop. Or the
derailleur can get physically mangled or bent. You usually know when you've
mangled a derailleur. You can check for bad pivots easy enough too. Just
grab the very bottom of your derailleur (where the bottom gear is) and
gently wiggle it towards and away from the wheel. There should be no or very
little play in the derailleur. If it�s flopping back and forth, it's time
for a replacement.
If you need a new rear
derailleur, I do have a recommendation for you. I avoid XTR components
because they are just too expensive, and everything on a bike wears out or
breaks quick if you ride a lot. I usually stick to XT class parts, but I
still used to go through 4 rear derailleurs every riding season, then I
switched to Shimano's XT Shadow rear derailleur. Get this derailleur! It's
really a great design. It has much less movement (meaning it doesn't flop
around as much). It�s much stiffer so it shifts better. It doesn't stick out
nearly as far, so it doesn't get caught on sticks and rocks as much. Now I
only go through 1 rear derailleur a year. That�s huge!
Long Cage or Short Cage?
Wondering which you should
chose? There actually isn't a choice. The cage portion of the derailleur is
just to tension the chain. If you have a big ring up front, you need a
longer chain, so you need the long cage derailleur to tension all that
chain. If you only have a middle ring in the front (or a granny and middle)
then you want a short cage, since you have less chain that needs to be
tensioned.
What about front derailleur?
Front derailleurs are
fundamentally different (and simpler) than rear derailleurs. A rear
derailleur does two things. It feeds the slacked chain into the gear you
want to be in, AND it acts as a tensioner and keeps your chain tight. A
front derailleur only works with the top of the chain that is in use. It
pushes the active top of the chain that is providing all of the drive power,
from gear to gear. There are only three gears in the front, so this is a
huge gap compared to a shift in the back.
So adjusting a front derailleur
has some similarities. Good cables are a must. Laying the cable and
adjusting the barrel adjusters and the limit screws are the same. None of
the rest really applies. The front derailleur doesn't feed the chain
directly; it just pushes the chain side to side as you shift. The only real
guides are: does it shift into all the gears, and does the chain rub against
the front derailleur when you're not shifting. Otherwise you're good. The
simplicity of the front derailleur explains why they usually cost 1/3 to 1/4
as much as a comparable rear derailleur.
And the final bit of knowledge
is, don't shift under load. You can't shift if you're not pedaling (and if
you do, you can mess up your perfect cable alignment). So you have to be
pedaling when you shift. But you have to be pedaling very lightly. If you
try to shift while you're pedaling up a hill, you'll do lots of grinding,
and you'll probably make your chain skip anyway, which will kill all that
momentum you were trying to save by pedaling hard while shifting. It's also
very easy to snap your chain if you are pedaling while shifting. It's an
art, but you need to very quickly go from hard pedal strokes, to very light
ones while you shift, then right back to hard strokes.
|