|
For many New England mountain
bikers and other cyclist, spring is that time of the year to make sure your
bike is safe and ready to ride. Whether you ride year round, once to the
corner store or pack up the bike for the winter months, it is always best
practice to perform annual maintenance ensuring no potential mechanical
failures are evident. If you are an individual who brings his or her bicycle
to the local bike shop for service, you may be one-step ahead rather then
doing it yourself. However, every mountain biker should be familiar with the
bike they ride since a pestering mechanical problem could rear its ugly head
leaving you no time to bring it to your local bike shop. This article will
identify and explain some basic maintenance points a do-it-yourself mountain
biker can perform on your mountain bike at home with minimal tools.
Technical Brief Section:
Below are the following section
covered in this article (Part 1 of 2). Each section provides a basic level
of information relative to the topic. This document does not cover all
technical, engineering and or maintenance aspects of mountain bicycle
maintenance or repair.
1.0 Basic Approach & Essential
Tools.
2.0 The Starting Point.
3.0 Frame. What to look for.
3.1 Frame Welds.
3.2 Frame Ovalizing.
3.3 Mechanical Interference.
3.4 Frame Tubing.
4.0 Drive-train & Shifters.
4.1 Chain.
4.2 Front Sprocket(s).
4.3 Front Derailleur.
4.4 Rear Cassette.
4.5 Rear Derailleur.
4.6 Rear Derailleur Hanger.
4.7 Shifters.
5.0 Suspension.
5.1 Check for fluid leaks.
5.2 Check the Stanchions.
5.3 Check the Air Pressure.
5.4 Check the Coil Spring.
5.5 Check the Spring Retainer
Plate.
5.6 Grease those Bearings &
Bushings.
6.0 Technical Wrap-up.
1.0 Basic Approach & Essential
Tools.
There are two basic approaches
for the do-it-yourself biker when performing maintenance on your mountain
bike. The first approach is to strip all the components off your bike�s
frame excluding the headset cups. The more basic approach is to remove what
components you can with the tools you have and inspect/clean everything else
that is still mounted on the frame. It will be much easier to perform
maintenance if everything is removed from the frame, but both approaches
will allow you to become familiar with the mechanics of your mountain bike.
If you consider your hands to be
all thumbs, having the right tools will make the job much easier and less
damaging to your components. I have personally seen pipe wrench marks on
wheel hub cones because the individual did not have the correct size cone
wrench to tighten them. Fortunately many mountain bikes share similar sized
mounting hardware and mechanical connections (i.e. crank arms) have been
narrowed down to a hand full of standard configurations. Regardless of
standardization, your mountain bike may require a specific tool that your
local bike shop may not have. So it would be a good idea for you to
familiarize yourself with your bike and identify what tools are required to
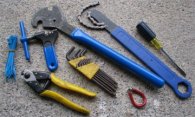
properly perform service. Below is a list of tools broken down into
categories a do-it-yourself biker should have before you attempt to service
your bike.
Please note this tool list does
not cover everything you need for bicycle repair; just the basics to perform
bicycle maintenance.
Basic Essential Tools:
Metric Allen Wrench Set 1.5mm ~
10mm, Metal bicycle tire levers, Small Adjustable Wrench, Chain Tool,
Bicycle pump, Flat Screwdriver, Phillips Screwdriver.
The next step up:
Basic essential tools PLUS' Bike
repair stand' Pedal Wrench' Spoke Wrench' Chain Whip' Cassette Lockring
Tool' Cable Cutter.
Almost everything you need:
The next step up PLUS, Bottom
Bracket Tool, Crank Puller, 6� Vise, Cone Wrench(s), Star Wrench Set size
T7, T9, T10, T15, T20, T25, T27, T 30, Torque Wrench.
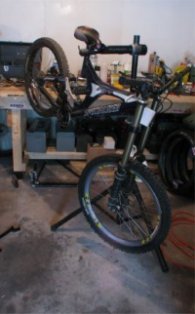
2.0 The Starting Point.
One of the biggest questions to
answer before you start is: �where do I start?� We consider every component
on your mountain bike important and where you start your maintenance should
not be a gated question. However, since all your components attach to your
bike frame, it would be best practice to check your frame first. You do not
want to spend hours checking all the other components just to find out your
bike frame has a stress crack. After checking the frame, the order in which
you approach everything else is up to you. We at Dieselbikes personally
following one of these two methods:
a. Leaving the bike assembled,
we check the frame first and then start with the handlebars working back
towards the rear wheel (top-down method).
b. Removing all the components
from the frame, we check the frame first and then deal with the components
that we know are giving us problems (tear-down method).
Each method will pose different
challenges for inspecting and cleaning techniques, but in the end you will
know more about your bike and have the confidence to tackle your next
maintenance cycle.
3.0 Frame.
Some riders can literally feel
frame flex when they ride and know when their frame has a stress crack or is
approaching the end of its usability. For the rest of us, checking the frame
can be a daunting challenge and is an important step many of us skip. The
simplest technique to check your frame, regardless you remove the
components, is to carefully look it over in a well lighted area. If a well
lighted area is not available, the use of a flashlight can help spot
potential problems you may miss if view the frame in poor light.
What to Look For
Once you have wiped your frame
clean (or as clean as you can get it) of foreign material, you want to begin
your inspection by looking these points listed below:
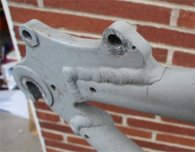
3.1 Frame Welds.
Frame welds are designed to be
the strongest points on the bike; however, they are also junction points
that take enormous loads when you ride. Look for paint cracks or flaking in
areas along the welds. This could be an indicator there may be an underline
stress fracture in the weld. However, you should also understand that paint
cracks or flaking can result from damage occurred during trail riding. If
you do find paint missing on the welds, carefully look for a crack in the
bear metal. If you cannot find anything but are still concerned, mark the
area with a sharper or white out and check it again after a few rides to
ensure more paint is not flaking.
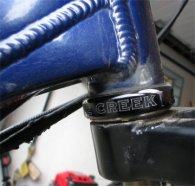
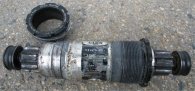
3.2 Frame Ovalizing.
Look for ovalizing of the head
tube and bottom bracket. On a bicycle frame, the basic term for ovalizing is
when a circular tube/shell is forced into an oval shape. When this condition
occurs to the head tube or bottom bracket, the material that once was
circular has now stretched into an oval pattern weakening its structural
integrity. 9 out of 10 times this condition will first occur on the bottom
of the head tube in line with the frame. Missing paint where the headset
contacts the frame and or binding of your handle bars as you turn them back
and forth could be an indication of ovalization. The bottom bracket shell
will be harder to check visually since it�s the lowest point of the frame in
relation to the trail and takes a beaten when you ride. A good method to
check the bracket shell is to remove the bottom bracket; insure the shell
threads on the frame and bracket cups are clean and then install just the
cups by hand with a light lubricate. Once the bracket cups are threaded more
then half way into the frame, they should begin to become snug and not to
have any side-to-side play or looseness in the direction of the thread. If
you thread the cups into the frame and they are loose, you may have a
problem with the frame shell or bottom bracket cups. We would suggest taking
your bike to a well qualified bicycle mechanic who can measure the bracket
shell and bracket cups to ensure they are within manufacturers
specifications.
3.3 Mechanical Interference.
Check the frame for mechanical
interference. Many of us buy a new bike, ride it for 6 months and then check
it only to find the brake line was cutting in to the frame just because it
was rubbing. Mechanical interference can lead to premature frame failure if
unchecked. We have personally seen frames where the side wall of the down
tube was damaged beyond repair due to the rear brake cable rubbing the
frame. We suggest you carefully look for frame wear that can or has resulted
from mechanical interference and resolve the problem immediately.
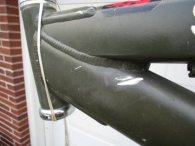
3.4 Frame Tubing.
Lastly you want to check the
frame tubing for stress or hairline cracks. Most mountain bike frames will
be littered with dents and scratches from our abusive trail riding. You
should check these locations for metal fatigue to insure no scratches are
migrating (growing). If you have a deep cut or scar in the frame that
concerns you, we suggest painting or dabbing both ends with liquid white out
before your next ride. Once you finished your ride, check the liquid white
out for cracks or flaking this may be a sign your frame is damaged. We have
had good results using liquid white out to detect frame cracks, even on a
white or non-painted frame.
4.0 Drive-train & Shifters.
Your bicycle drive-train is the
heart and sole of your riding experience, yet when it comes to maintenance,
it usually is the most neglected. Your drive-train has the most moving parts
in one assembly; it utilizes a derailleur to shift gears that also applies
tension to minimize chain slack and is required to operate fully exposed to
the outside elements. During any maintenance period, it is best practice to
check your drive-train for smooth operation, clean off any heavy debris and
apply lubrication as required. Symptomatic problems such as chain slippage,
gear skipping and chain suck can be greatly reduced by performing periodic
maintenance. Below are some maintenance checkpoints for your mountain bike
drive-train.
4.1 Chain.
The chain is probably the most
important component in the drive-train. You want to frequently clean and
inspect the chain to ensure it is in good working order. We suggest reading
our Technical Brief # TB-09-0124 regarding bicycle chain maintenance.
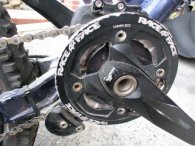
4.2 Front Sprocket(s).
Whether you have one, two or
three front sprockets, the need to clean and remove debris is the same.
Cleaning the front sprocket(s) while it�s still assembled on the crank arm
is fairly easy, but occasionally you should remove the sprocket(s) from the
crank arm for a complete cleaning and inspection. Many times cleaning the
front sprocket(s) still attached to the crank arm will not allow you to
remove heavy built-up grime. This grime will not only transfer back onto
other components of the drive-train, but also accelerate wear. You should
also check for excessive wear of the sprocket(s). There is no specific
science for checking sprocket wear, most aggressive mountain bikers destroy
their bike before wearing out a single sprocket. There are different
techniques to check for wear and for the average mountain bike it would be
best to consult a well qualified bicycle mechanic for assistance.
4.3 Front Derailleur.
The front derailleur is the
easier of the two derailleurs on your mountain bike to maintain; if you even
have a front derailleur. Many mountain bike front derailleurs can be cleaned
fairly well still mounted on the frame. For the average mountain biker, you
probably choose to clean the derailleur still mounted on the frame to save
the hassle of de-tensioning the shifting cable and re-adjusting once you
remount the derailleur to the frame. This may be one of those components you
can cheat on when maintaining your mountain bike, but you should still
familiarized yourself with appropriate installation and adjustment methods
(consult product mfg�s manual) so you can remove the derailleur for proper
cleaning and inspection.
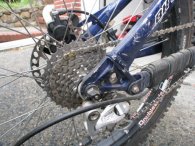
4.4 Rear Cassette.
Rear cassettes are an art form
these days. 8-speed or 9-speed mountain bike cassettes are designed to
efficiently engage the chain under various loads and rotational speeds to
ensure your power is put to the wheel. This explains why they are costly to
replace. Just like front sprockets, frequent cleaning and inspection will
maintain the products designed performance and increase its usable cycle
life. Unlike the front sprockets, cleaning the rear cassette still attached
to the hub is not the best practice. Even if you removed the wheel from your
bike and attempt to clean the cassette with an old tooth brush, you are
still going to waste more time and energy then just removing it. You also
run the risk of contaminating your hub with dirty cleaning solution as you
try to clean the cassette. We truly suggest investing in a cassette removal
tool for maintaining this drive-train component. In the end you will be able
to clean the cassette more frequently in much less time then leaving it
mounted on the hub. Again, there is no specific science for checking
cassette wear but there are a number of techniques. We would suggest you
consult a well qualified bicycle mechanic for assistance on identifying
cassette sprocket wear.
4.5 Rear Derailleur.
Your rear derailleur can be one
of the trickiest drive-train components to maintain. Hanging below the chain
stay, the rear derailleur is exposed to debris kicked up by your wheels and
near misses as you pass around trail obstacles. When performing maintenance
on your rear derailleur, the first item you want to check is the
straightness of the derailleur cage. The cage is the derailleur component
that contains both pulleys. If this cage is bent or misaligned you will feel
plenty of frustration shifting your gears when riding. There are methods to
fix a misaligned cage, but for the average mountain bikers, you may want to
replace it. Don�t be afraid to clean your derailleur pulleys. The derailleur
pulleys (or tension pulleys) are ideal locations for grime buildup that
affect the overall performance of your drive-train. The pulleys should be
removed periodically to be cleaned and lubricated. Also, check and lubricate
the pivot point on the derailleur body to ensure smooth operation when
shifting gears. Derailleur alignment is critical for excellent performance.
Most mountain bikers will not have access to an alignment tool, so you will
need to rely on visual inspection. We suggest reading our Technical Article
# TA-09-0430 regarding bicycle Derailleur maintenance.
4.6 Rear Derailleur Hanger.
Check this component at the same
time you check the rear derailleur. The rear hanger can be the culprit a
number of drive-train issues if the hanger is misaligned. There are tools
available to measure and straighten a bent hanger; however, for the average
mountain biker; your eyes may be your best tool. If your hanger is slightly
bent, remove it from the bike and use a vice or two adjustable wrenches to
straighten. Be careful because every time your hanger bends, it weakens and
will break. We suggest carrying an extra hanger (as back-up) when you ride
in the event you need to replace it.
4.7 Shifters.
Derailleur shifters are
components many mountain bikers neglect and view as a �black box.� The
internal mechanics of a shifter are rather delicate and care should be taken
if you need to open them up. Depending on the brand of shifter you have,
lubrication is the minimum requirement for maintenance. We suggest you read
the instruction or service manual for the brand of shifters on your mountain
bike for more information. If you do not have this information, search the
internet for the manufacturer�s website; most of them have this information
online.
5.0 Suspension.
Suspension maintenance can be a
tricky subject for the average mountain biker to tackle. Different fork and
shock manufacturers may have specialty tools required for maintenance and
specific instructions on servicing their suspension without damaging it in
the process. Once the matter of maintenance has been completed, re-tuning
the suspension becomes the next challenge. If you�re like most mountain
bikers, you probably never attempted to adjust your suspension, let alone
read the product manual. Proper suspension maintenance and tuning can make
or break your ride experience. We strongly suggest that you read any product
literature the manufacture of your fork or shock has published. They created
this documentation for you to get the most from there product without
destroying it. Most suspension manufactures suggest their products are
overhauled annually. This is not a ploy to make money, the reality is your
suspension takes an enormous amount of stress when you ride and internal
components (even the fluid) do wear down. If you are unfamiliar with
maintaining or servicing your fork or shock, bring it to a well qualified
bicycle mechanic who can perform this service. With that said, for the
average mountain biker there are still a few service points you can check
when maintaining your mountain bike:
5.1 Check for fluid leaks.
Regardless you have a front fork
or rear shock, fluid leaks are a definite sign something is wrong. Most
likely the problem may just lye with seals/o-rings; however, there could be
other internal problem that will worsen if not resolved quickly.
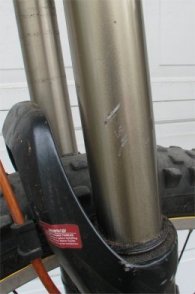
5.2 Check the Stanchions.
Check your front fork stanchions
for scratches that could cause damage to the seal. Some scratches may need
to be buffed to prevent cutting of the seals; consult the product
manufacture for proper repair method.
5.3 Check the Air Pressure.
Many forks and shocks are air
operated rather then fluid filled. If you own suspension that works on air
pressure, invest in a �Shock Pump� and check the suspension at least every
other ride. Consult the product manual for proper air pressure and
maintenance procedures if a leak appears to be present.
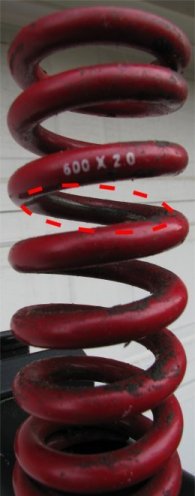
5.4 Check the Coil Spring.
If you have a shock that
contains a coil spring, check the spring coils to ensure they are not
contacting each other when the shock is compressed. All coil springs lose
there strength as they are continuously compressed. Coils that contact each
other can indicate a host of problems. Some of those problems are but not
limited to; fractured spring; worn-out spring, undersized spring (lb force),
internal fluid or component fatigue.
5.5 Check the Spring Retainer
Plate.
All rear coil-over shocks will
have a spring retainer plate. Check this plate periodically to ensure it is
not showing any signs of fatigue that could result in mechanical failure.
5.6 Grease those Bearings &
Bushings.
Don�t be afraid to remove the
shock or fork to apply some grease. Pivot or rotating points for your
suspension need to periodically be cleaned and lubricated. Failure to
maintain these critical points could damage the shock/fork body or bike
frame.
6.0 Technical Wrap-up.
We hope this technical brief
stressed the importance of mountain bike maintenance and provided additional
information you may not have known. You should consider every component on
your bike to be as important as the next. Proper cleaning, maintenance,
repair and lubrication will not only extend the life of your mountain bike
but also improve your ride experience. We suggest creating an individual
maintenance schedule based upon your frequency of riding, elements you ride
in and style of riding. It is best practices to perform a major service
overhaul annually to ensure your mountain bike will perform to your
expectations. Although annual service is the bear minimum, if you punish
your equipment, you may want to consider major service every 3 months.
Whether you service your own mountain bike or have a professional bicycle
mechanic complete this work, the performance of your mountain bike is a key
factor for your ride experience. A great performing bike will give you the
confidence to try new technical challenges and have more fun with less
mechanical frustrations!
|